 Standard Operating Procedures
Managing Work Orders
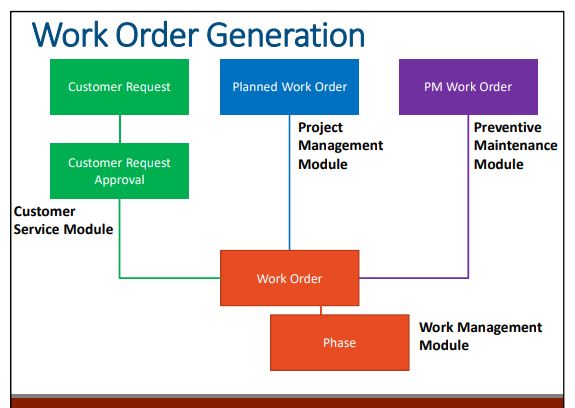
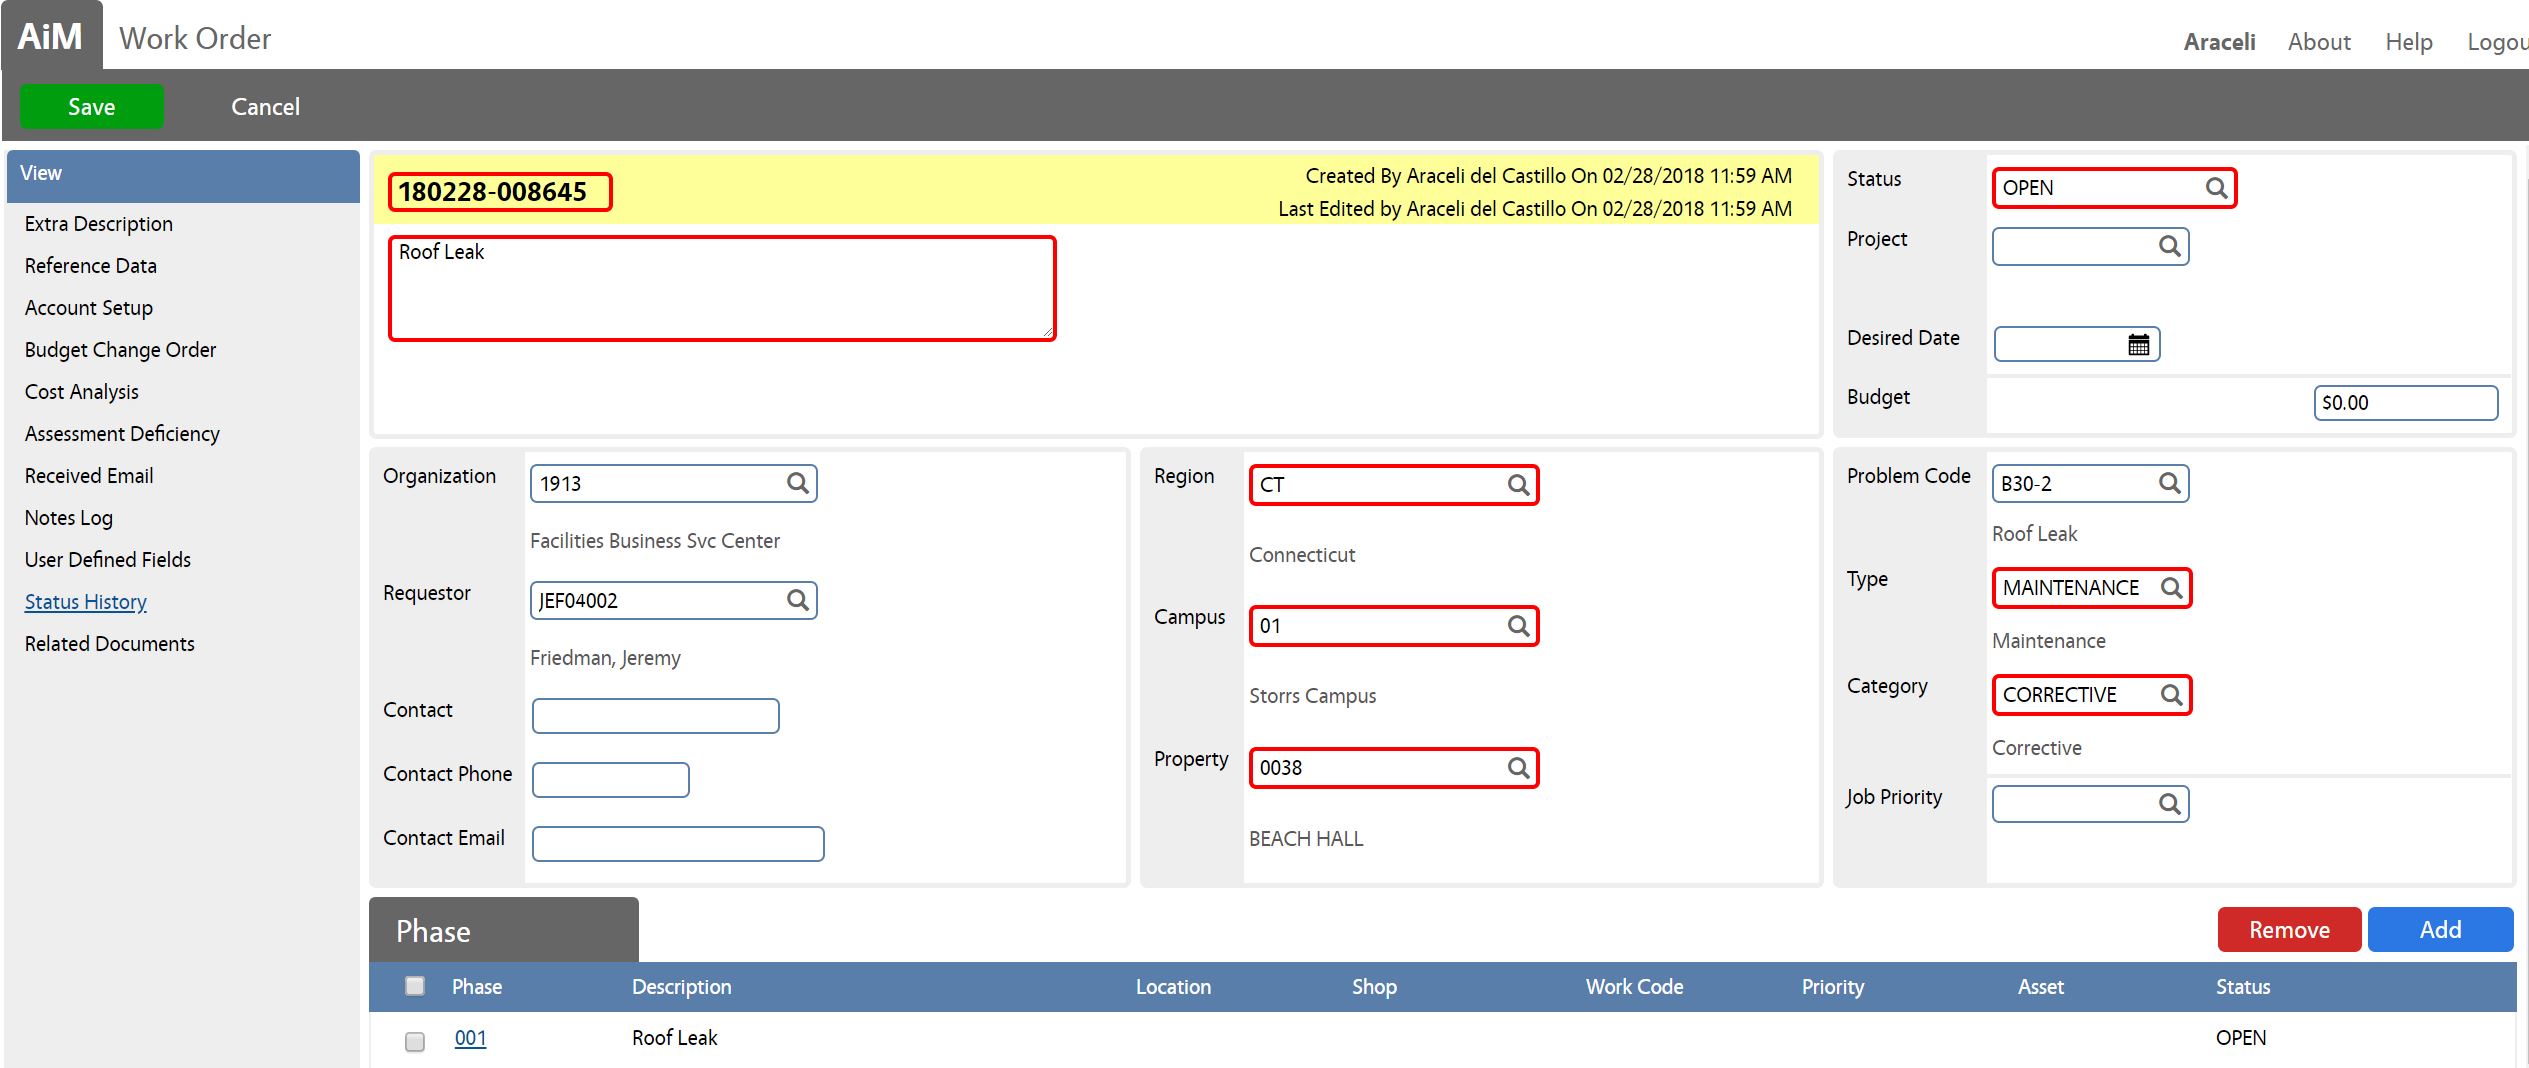
Found in the Work Management module, the Work Order screen is the primary screen for tracking work in AiM. It defines how work is classified, who requested the work, where the work is to be performed, by whom, the amount of time to accomplish the job, and the amount of money the job required.
A work order can be created through several methods of input, and the process may include some or all part of the process below:
| Modules | Description |
| Customer Request Module | Work orders originating from customers are entered in this location and approved by staff in this location. |
| Project Management Module | Work orders originating from projects are entered in this location. |
| Preventive Maintenance Module | Work orders originating from preventive maintenance templates are entered in this location. |
| Work Management Module | Work orders originating from staff are entered in this location, all work orders can be searched and schedule from this module. |
Filling out the work order with as much information is critical for assigning of work as well as reporting. The fields listed below follow specific data standards and hierarchical relationships.
- Request Description
- Organization, Requestor
- Region, Facility, Property
- Work Type
- Work Category
- Status
- Problem Code (if applicable)
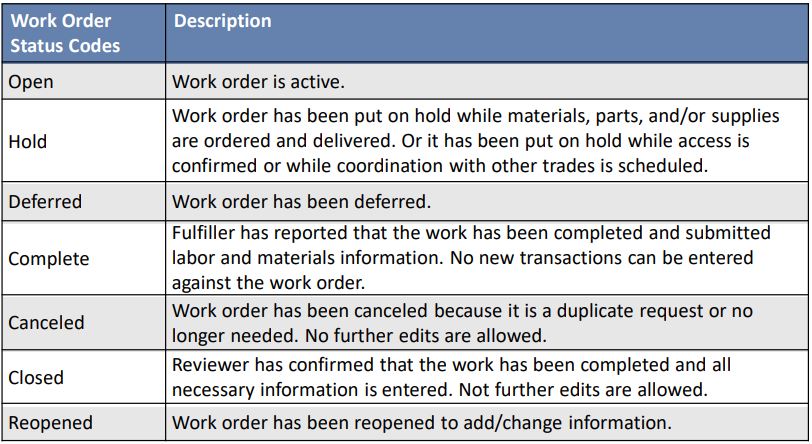
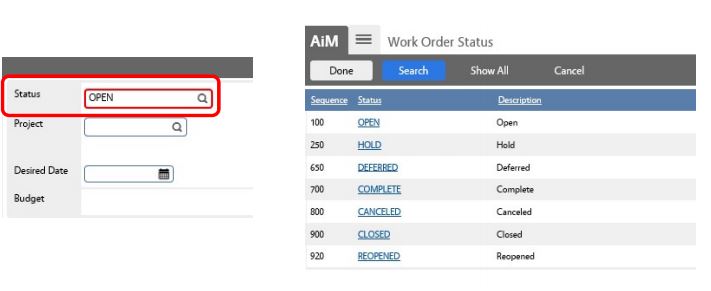
Work Order Status
Work Order Status Codes are used to document the progress of work as it is completed and are linked to a work order.
• The work order will default to Open.
• Once you have selected Edit, and the work order is open, update the status as needed.
• The fields cannot be edited once the work order is flagged as Canceled, or Closed.
Work Order Status – Role Permissions:
| Technicians | Will NOT be able to update work orders statuses. |
| Supervisors | Will NOT be able to update work orders statuses, they can only create work orders (open status). |
| Operations Admin | Will be able to update ALL work order statuses. |
The following instructions reflects the creation of a work order through an authorized individual directly creating the work order (via Work Management Module).
PROCEDURE:
| 1. Navigate to the Work Management module on the main menu. | 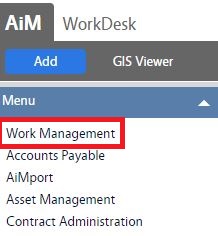 |
||||||||||
| 2. Navigate to the Work Management screen and click the link to Work Order. | 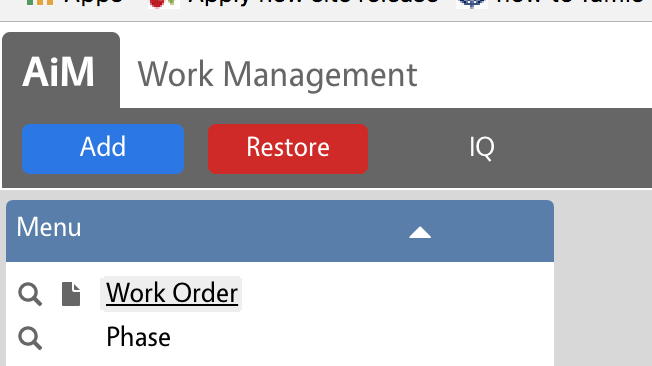 |
||||||||||
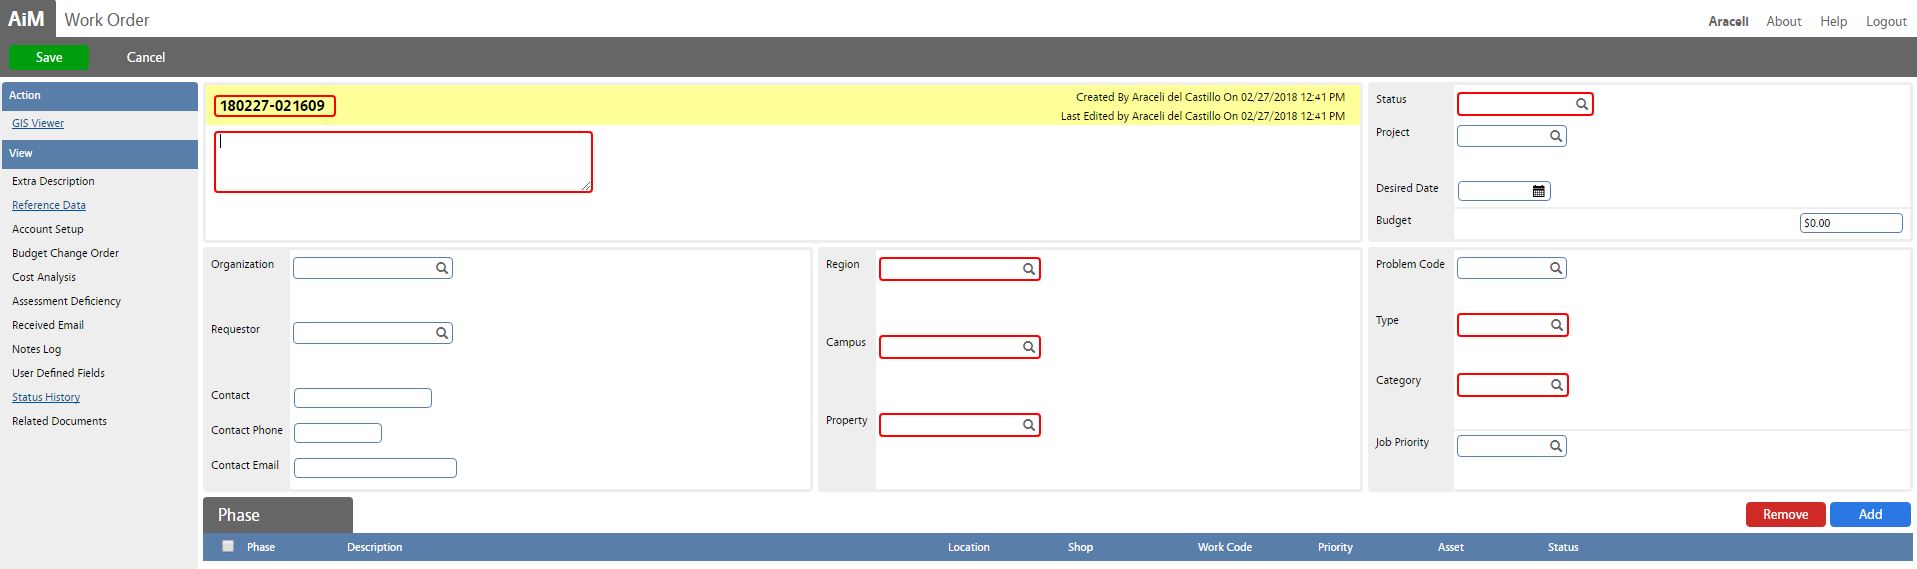
| 3. Click New to create new Work Orders. The new work order form will appear. | |
||||||||||
| The new work order form will appear. Note that the red highlighted cells are required fields.
Required fields (although not all highlighted in red) include:
1. Work Order Description
|
 |
||||||||||
|
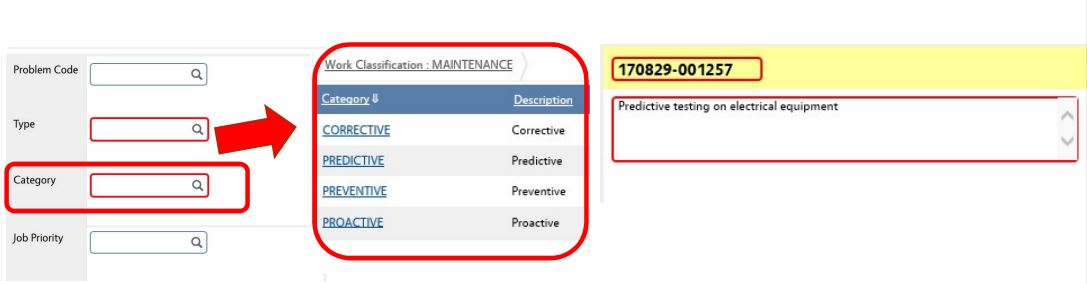
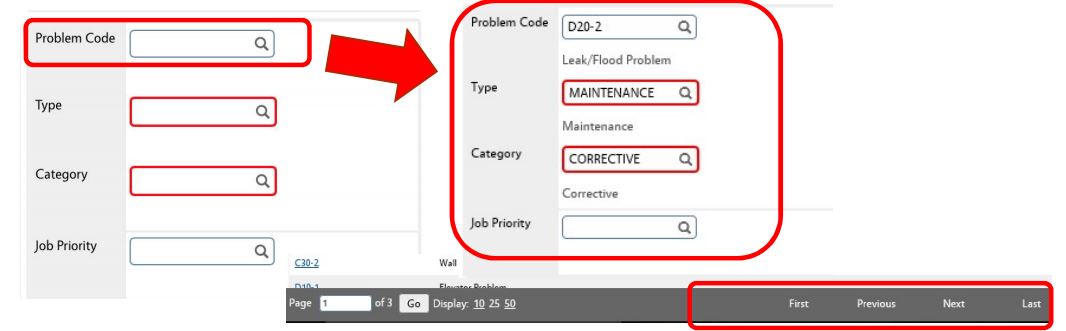
4. Problem Code vs NO Problem Code:
*If the work is requested in response to a problem or inspection*:
• Select the magnifying glass next to the Problem Code field to open the list of Problem Codes. • Use the Previous and Next options at the bottom of the page to scroll through additional pages of the list. • The Work Type and Category will be made based on the Problem Code entered. • The Description will be populated based on the Problem Code entered. The Description can be edited to include additional details if necessary.
Note: A phase gets generated automatically and it will also default the status to “Open”. Click Save to save the new Work Order. |
|
||||||||||
| 4. Problem Code vs NO Problem Code (Cont…)
*If the work is not requested in response to a problem or inspection (such as PM tasks, or vibration monitoring)*:
• Leave the Problem Code field blank. • Select the magnifying glass next to the Category field and choose the correct Maintenance Category from the list. The Type field will automatically default to Maintenance. • Fill in the Description with the appropriate description of work. |
 |
||||||||||
*The Operations Center is responsible for selecting and verifying work category codes.*
|
|||||||||||
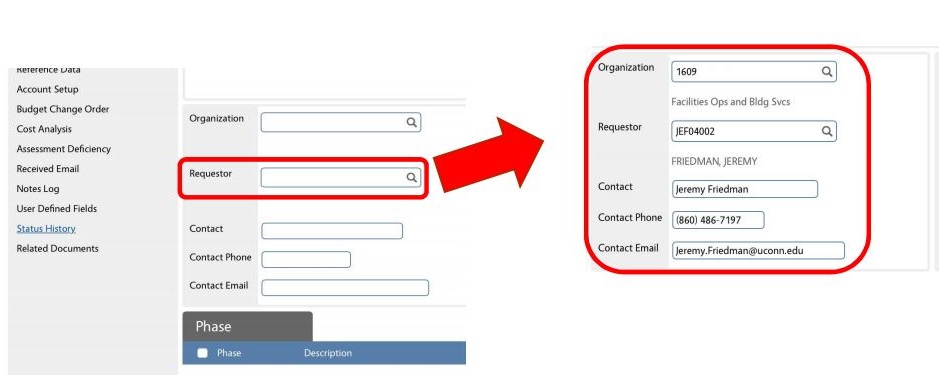
| 5. Requestor Information:
*If the Net ID of the requestor is known*:
• Enter the Net ID of the requestor in the Requestor field. • Click on the magnifying glass.
The requestors contact information will be populated based on the Net ID entered.
Note: Customer Requests created via the Maintenance app will record the requestor information. |
|
||||||||||
|
5. Requestor Information (Cont…)
*If the Net ID of the requestor is not known*:
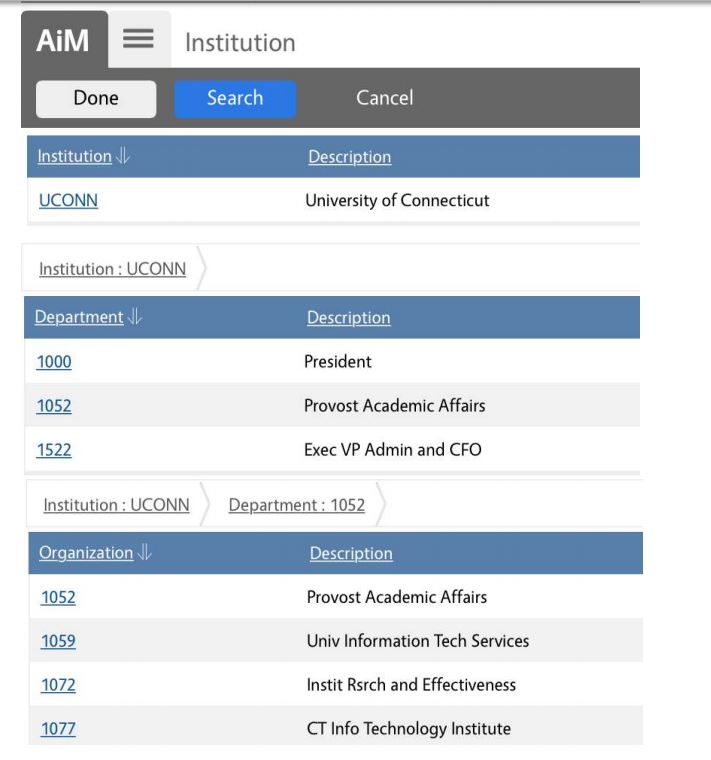
• Click the magnifying glass next to the Organization field. • Select the Institution, Department, and Organization of the Requestor. |
 |
||||||||||
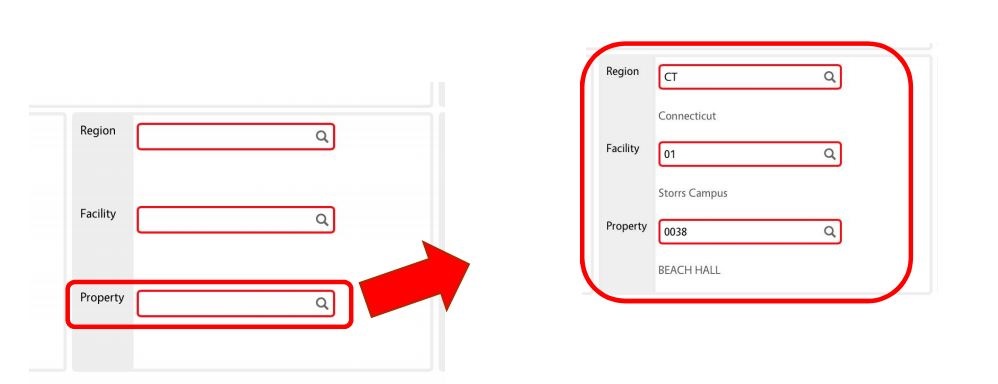
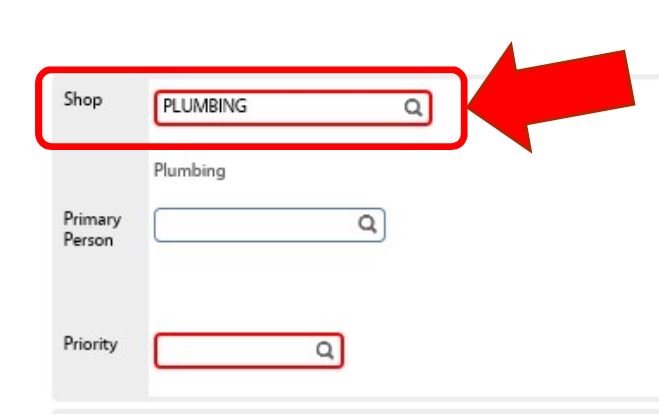
| 6. Location Information:
*If the property number is known*:
• Enter the property number in the box. • Click on the magnifying glass.
The Region and Facility will be populated based on the |
|
||||||||||
| 6. Location Information (Cont…)
*If the property number is NOT known*:
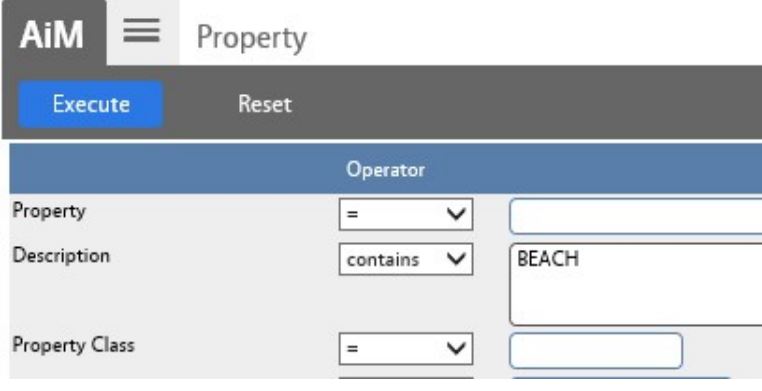
The Search function can also be used when the property number is not known. Search for the property name in the Description box after selecting the Region and Facility.
UConn has set up the fields as follows:
• Region – Connecticut is the Region in each scenario
• Facility (Campus) – The Facility standards are divided by Campus (Storrs, Hartford, Stamford, etc.)
• Property – The Property options are divided into buildings or areas under each Campus (i.e. Storrs Hall, Hawley Armory, Softball Dugout) |
 |
||||||||||
| 7. Click Add to add work Order Phases. | 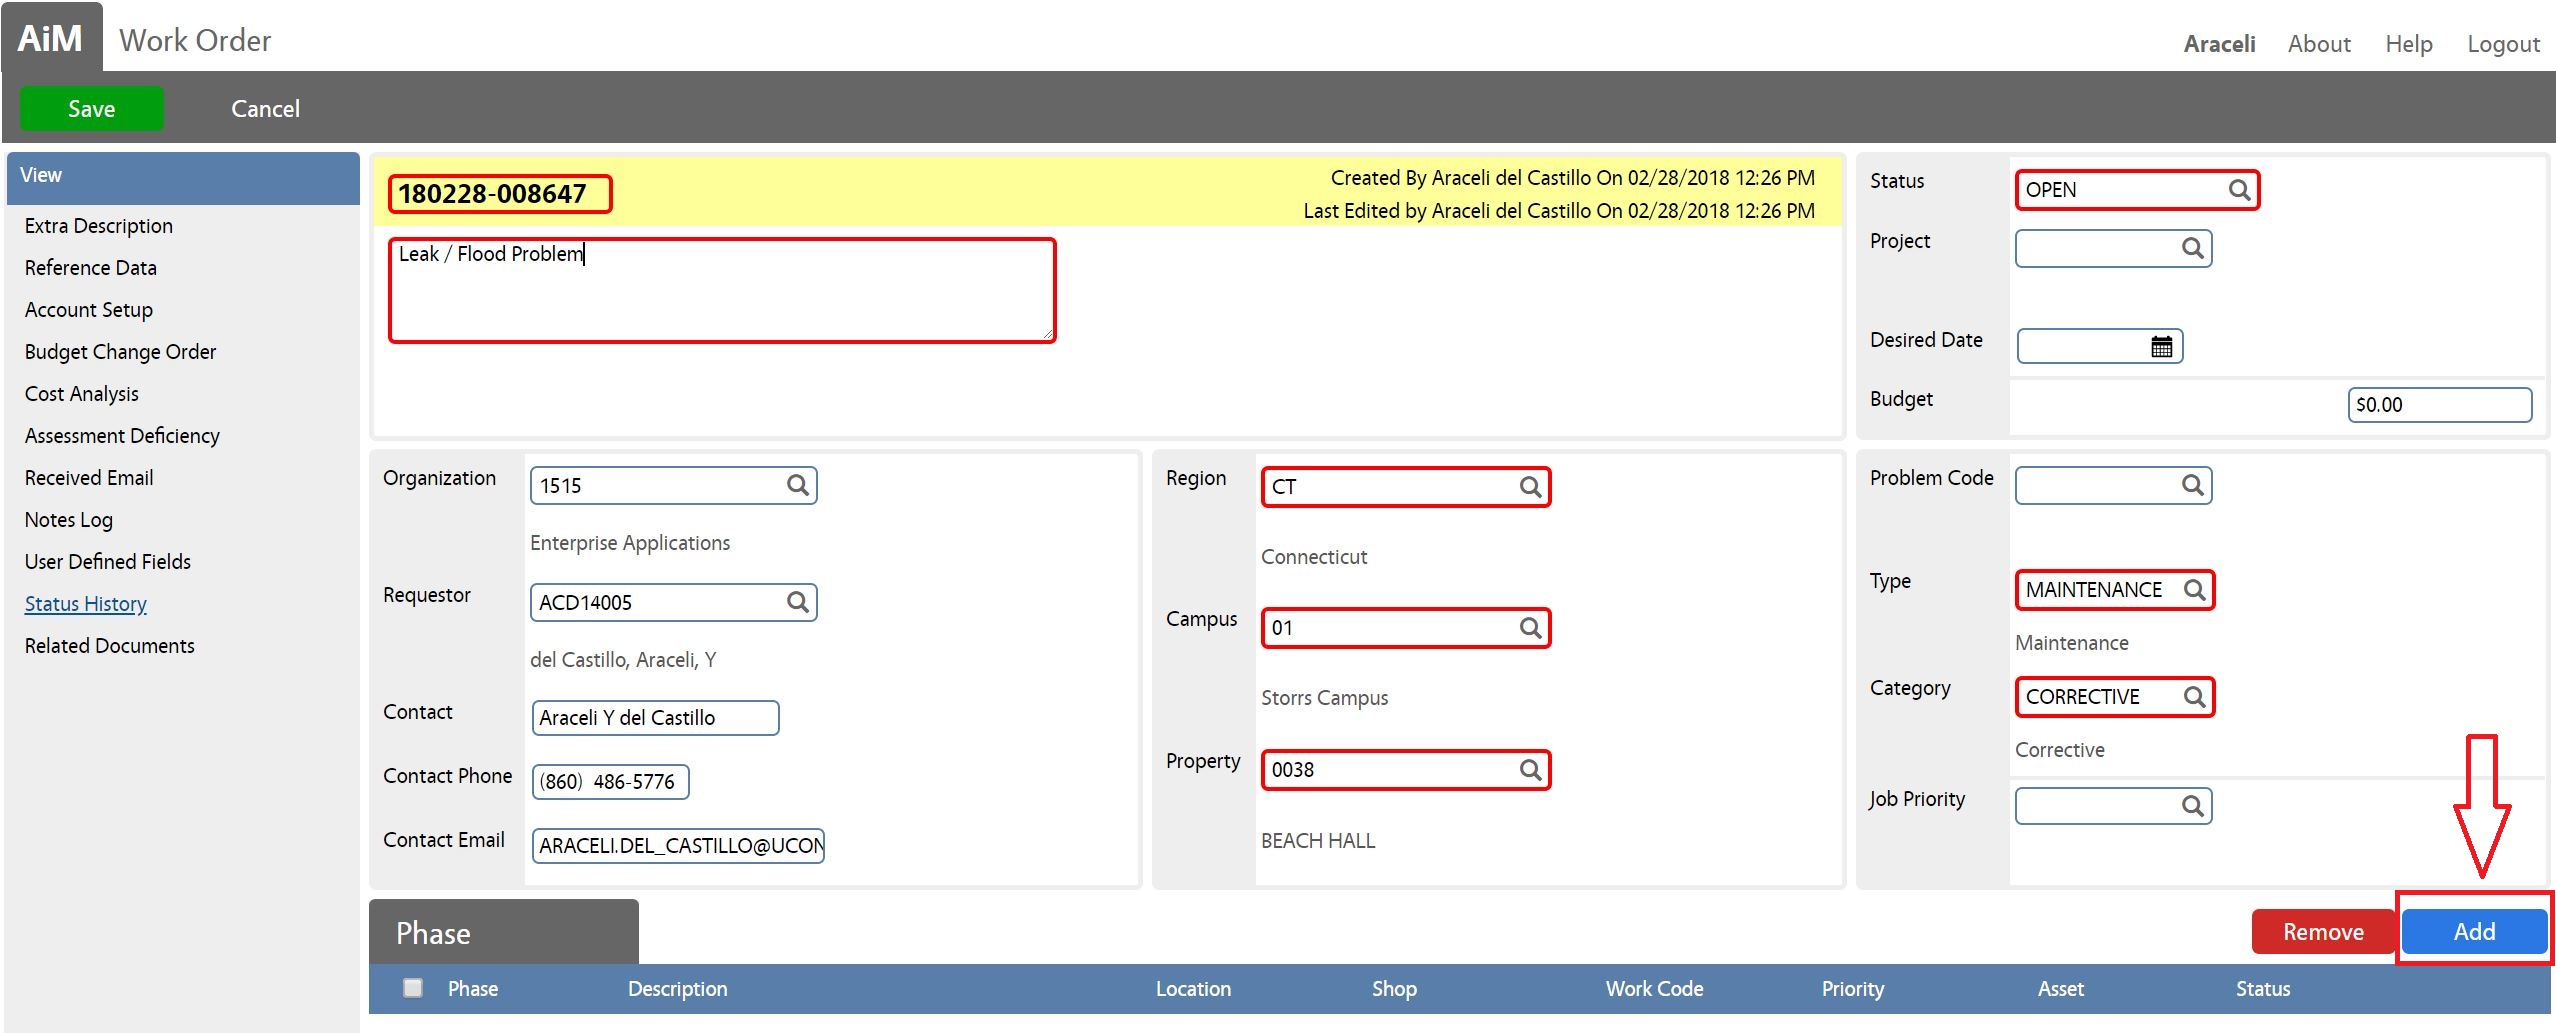 |
||||||||||
| Work Order Phase screen will appear. | 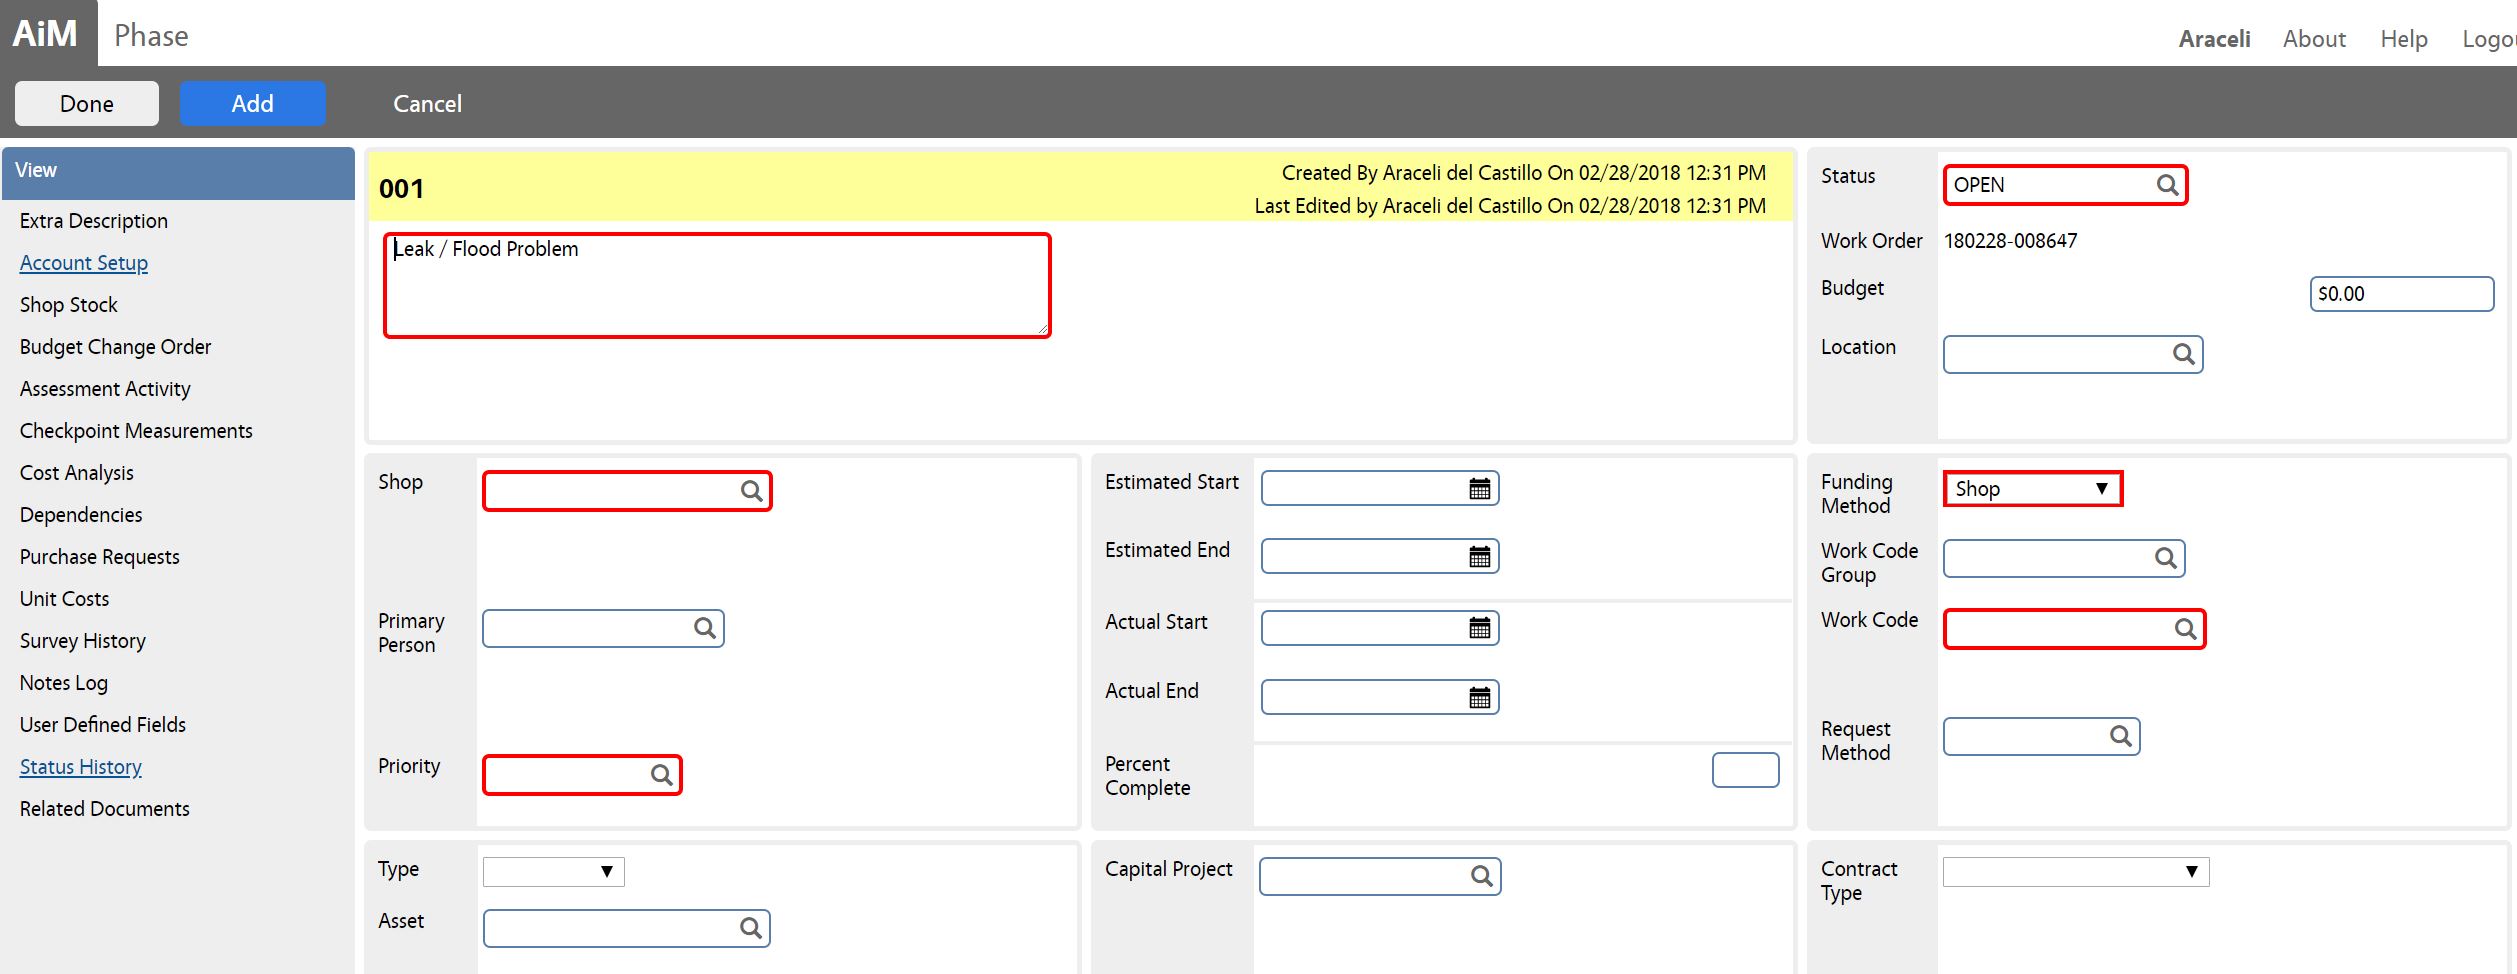 |
||||||||||
| Again, the description box in the Phase can be edited to provide additional details when necessary. | 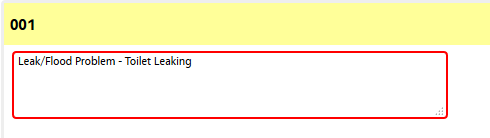 |
||||||||||
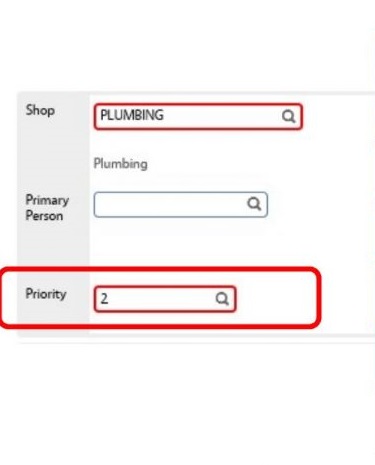
| 8. Shop Assignment:
*If the name of the shop for the phase is known*:
• Enter the name of the shop that will be responsible for the request/problem in the Shop field and then click on the magnifying glass.
If the name of the shop is unknown, click on the magnifying glass and select the shop from the available list. |
|
||||||||||
| 9. Location Information:
*If the location (room number) for the phase work is known*:
• Enter the location into the Location field and select the magnifying glass.
|
|
||||||||||
| 9. Location Information (Cont…)
*If the location (room number) for the phase work is NOT known*:
• Browse through the list of locations by clicking on the • The Search function can also be used when the location • The list of options will appear based on the Property selected within the work order. |
 |
||||||||||
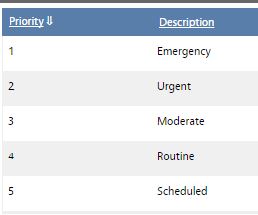
| 10. Phase Priority:
*If the priority of the phase is known*:
• Enter the priority of the Phase (1-5) in the Priority field. |
 |
||||||||||
| 10. Phase Priority (Cont…):
*If the priority of the phase is NOT known*:
Click on the magnifying glass next to the Priority field to view descriptions of each priority rating and select the corresponding rating.
For more information on priority codes, refer to the data |
 |
||||||||||
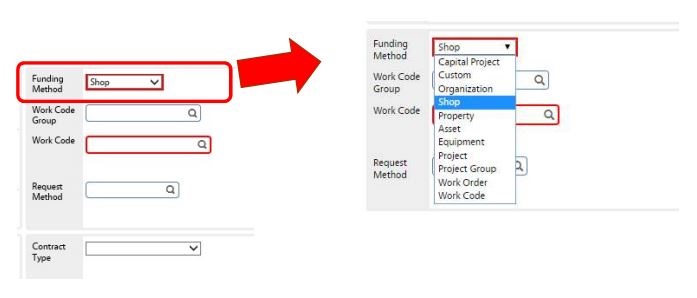
| If another method of funding is required, click on the drop down menu and select the appropriate funding method.
All maintenance work will use the Funding Method of Shop,
The Operations Center is responsible for selecting the correct
More details on when to choose each funding method are included in the Billable Work Requirements section. |
 |
||||||||||
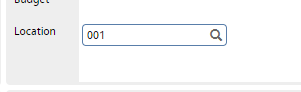
| 11. Location Information:
*If the Location (room) number is known*:
• Type it into the Location field and hit the magnifying glass. |
 |
||||||||||
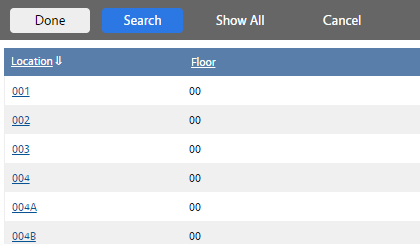
| 11. Location Information (Cont…)
*If Location number is NOT known, see instructions below*:
• Leave the Location field blank and click the magnifying glass. Search the Location column for the desired Location and click on the Location number.
* Use the Previous and Next options on the bottom of the page to scroll through additional pages if the Location is not available.* |
 |
||||||||||
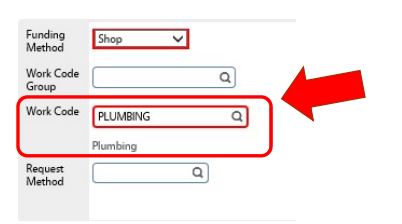
| 12. Phase Work Code:
*If the work code for the phase work is known*:
• Enter the code relative to the request/problem in the Work Code field and select the magnifying glass.
|
 |
||||||||||
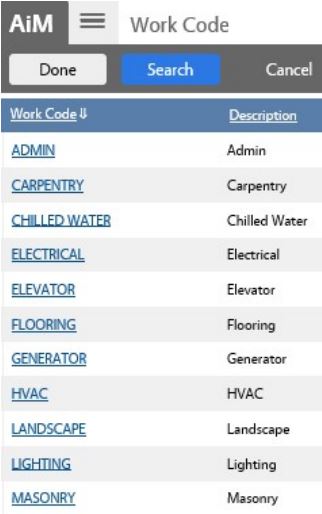
| 12. Phase Work Code (Cont…)
*If the work code for the phase work is NOT known*:
• Click the magnifying glass next to the Work Code field.
• Select the code relative to the request/problem from the provided list. |
 |
||||||||||
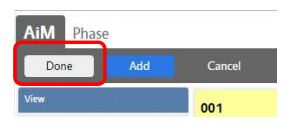
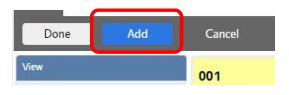
| 13. Additional Phases:
*If this is the only phase needed for this work order*:
• Click the Done button.
*If additional phases needed for this work order*:
• Click on the Add button and repeat the process of inputting the Phase information for all necessary phases. Once all phases have been entered, click on the Done button in the upper left corner. |
|
||||||||||
| 14. Click Save to save the new Work Order |  |
||||||||||
| Phases Creation Summary:
*If the work is requested in response to a problem or inspection*:
• A Phase will automatically be created based on the Problem Code entered.
*If the work is not requested in response to a problem or inspection*:
• Leave the Problem Code field blank.
*Phase numbers are automatically generated in consecutive order beginning with “001” for each work order. The Phase Status will automatically be set to Open*. |

|
||||||||||


ROLES USED:
1. Operations Admin: [TODO:FOBS define refine rules here]
2. Operations Center Management: [TODO:FOBS define refine rules here]
3. Supervisor: [TODO:FOBS define refine rules here]
4. System Administrator:
System Administrator is responsible for managing and overseeing the Work Management module its configuration and functionality.
Return to Work Management Module SOP